DIY Christmas Button Wreath

handmade-button-wreathHello! I’ve got another festive make for you today and I think it’s one of my favourites so far: a do-it-yourself Christmas button wreath! I think it’s perfect for a sewing or crafting fanatic’s home, don’t you?

The inspiration for this make came from the lovely Lisa at A Spoonful of Sugar. I saw her own button wreath on Twitter and knew straight away that it was something I’d like to copy. Who else has a collection of 10 million buttons at home that they need to use up? My sister thinks I need to join Button Hoarders Anonymous, but I’m sure it can’t just be me…

If you’d like to make a button wreath of your own then you’ll need:
button-wreath-what-you-need– Buttons! My sister and I spent a good half hour sorting through my collection to pick out all the red, white, green and gold ones, but you can pick whichever colours you want. I think we easily used about 400 buttons.
– A 30cm polystyrene wreath.
Dressmaker pins.
2.5mm beads. I used pearl coloured ones.
– Co-ordinating ribbon. I used some by Gisela Graham that I had in my stash.

diy-button-christmas-wreath
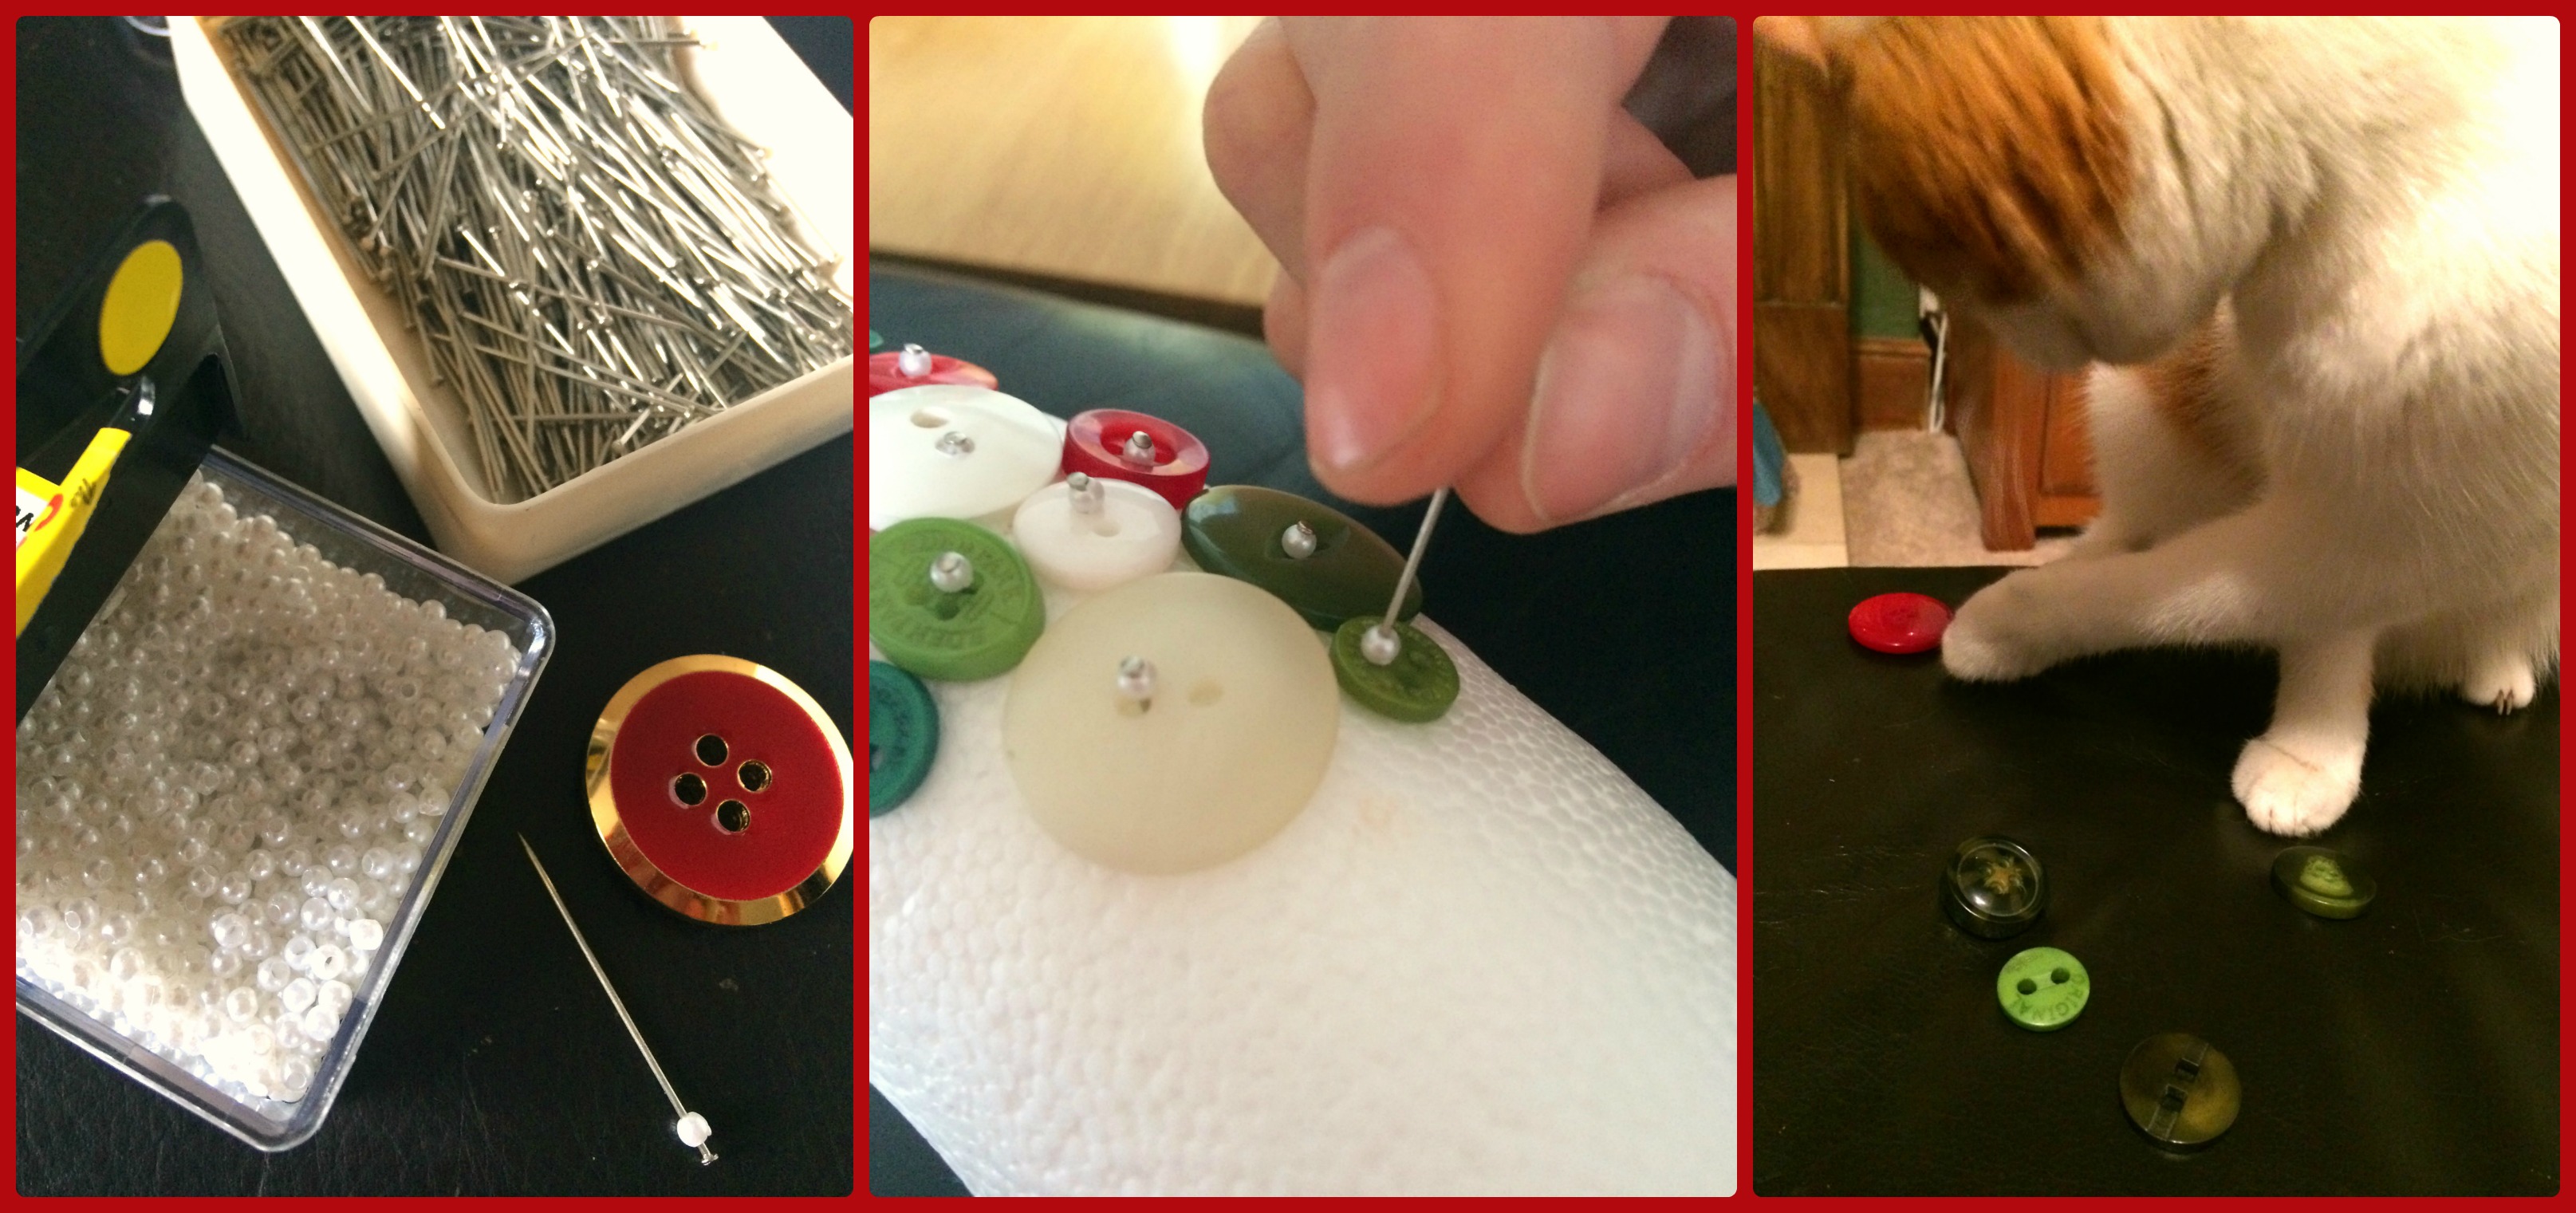
Decorating the wreath is very easy! My sister and I spent about 3 hours yesterday afternoon pinning in all the buttons. You simply thread a bead onto your pin, and then push the pin through the hole in the button and straight into the polystyrene. It’s important that you don’t forego the beads as these prevent the buttons from falling off! We chose to go for a random colour pattern too, although you could do stripes, varigated colour or all one colour if you wanted.

how-to-make-a-button-wreathI also chose to pin a ‘Merry Christmas’ ribbon around the outside edge, and a red and white striped ribbon to the inside edge, partly because I like the look of it and partly because we were running out of buttons to cover the entire wreath! I’ve estimated that we used around 400 buttons for this, so you’d easily need 500+ to cover every available space. I had a mixture of button sizes too, ranging from tiny shirt buttons to bigger 2cm diameter ones, and in a variety of different shapes and shades.

diy-button-wreath-ribbon

Finally, I made a loop out of ribbon to hang my wreath with (this is just pinned in place on the back), and then used a piece of wide red ribbon to create an over-sized Christmas bow, which I also pinned in place on the top. And there we have it! An afternoon well spent. What do you think?

make-a-button-wreath

Save

Save

Save

Save

Blogger Network #28 – Felt Christmas Decorations

dimensions-holiday-home-felt-ornaments

Hello November! A new month brings with it a new Minerva Blogger Network project, and this month I’m keeping things festive with these cute felt Christmas house ornaments. These were an absolute delight to make and I think they’ll look lovely alongside the Father Christmas cushion I made last month – don’t you?

Click here to read more about my festive make!

Blogger Network #27 – Father Christmas Cushion

Design Works Santa Cushion Kit

Welcome, October! It’s time for a new Minerva Crafts Blogger Network post and this month I’m crossing my fingers and hoping you don’t think it’s *too* early for something a bit festive! I actually made this Design Works Embroidery Santa Cushion Kit on the first rainy weekend back in September and I’ve been feeling wonderfully Christmassy ever since. Isn’t he just adorable?!

Click here to read more about my make!

Save

Blogger Network #19 – Beaded Christmas Bells

beaded bellContinuing on with the recent Christmas-themed blog posts, today I’ve got a fun little Christmas decoration project to show you! I’ve been away from my monthly Minerva Blogger Network posts for a little while because of moving house/life/etc but I’m back in time for the festive season with this beaded bell kit!

The kit can be found on the Minerva Crafts website here – it’s a Design Works kit and comes with all the thread and beads (a mixture of gold and pearl) that you’ll need to make five sparkly decorations. I actually had quite a few bits leftover too so you could probably make six!

beaded bells

beaded bell decorationI think each bell took me about an hour to make but they’re a great DIY project for when you’re sat on the sofa catching up on boxsets or watching the Christmas 24 channel (ahem, not that I’ve been doing that). All you need to do is cut a long piece of cotton and then follow the instructions to thread on the beads in the right order. It’s very satisfying seeing the bell emerge- the instructions require lots threading back and forth but, once you’re done, a fully formed bell magically appears! All from one piece of thread and a christmas beaded bell decorationseries of gold beads and pearls. You only have to thread the needle once the whole time, too!

The finished decorations are about 4cm tall and will look lovely hanging from my tree or mantlepiece. I love how the gold shimmers when they’re hung next to fairy lights too. They’re pretty timeless and I’m sure I’ll be bringing them out of the Christmas decorations box for years to come.

What do you think? Have you made any Christmas decorations this year? And are any of them beaded? Let me know!

Sew Your Own Advent Calendar

advent calendar sewingJust a quick sewing project for you today – a DIY Advent calendar! As a child we used to have a big, fabric advent calendar with little pockets that my mum used to hang on the wall each December. She’d fill the pockets with three sweets – one each for me and my two sisters – and it was such an exciting time. I loved reaching into those numbered fabric pockets and seeing what Advent treat had been put there for the corresponding day!

As a slight homage to my mum’s version – and because I now have my own house – I’ve made my own version and hand-sewn what I hope will become a family heirloom (maybe). And it couldn’t have been easier!

The Advent calendar is made using one of those quilting panels that you can pick up in most fabric shops. The panel features instructions printed at the top, 25 numbered squares printed below and the backing fabric to which you attach the pockets. I think I got my Advent panel from eBay for about £7 but I’ve seen them around the internet at Elephant in My Handbag, and Etsy amongst others.

patchwork advent calendar kit

The calendar is actually quilted, so you sew a layer of wadding in between two layers of fabric. The pockets are then sewn directly onto your padded backing, creating a quilted effect. It’s a very simple project to make but looks really effective when it’s finished. The worst thing about it was having to press all the pockets! All four edges needed to be folded under and ironed before they were stitched down so it’s a very hot job to do!

hand sewn adent calendar

What do you think of my finished Advent calendar? I really love it. The illustrations of the little woodland animals on the pockets are so sweet and I love the Christmas-sy colours! Now I just need to plan which sweets and treats to put in it come December!

Blogger Network #9 – Felt Woodland Animal Christmas Decorations

Here we are in November, meaning that Christmas is just around the corner, eek! For this month’s Minerva Blogger Network post I chose to do something a little festive and a little fun – felt woodland animals! In fact, a whole garland (woodland?) of felt animals.

simplicity 1516 felt animal christmas bunting

The pattern/templates that I used came from Simplicity 1516 – an entire sewing pattern dedicated to felt animals and Christmas stockings. Marvellous! I chose to make the moose, fox, bear and snowman patterns as they’re my favourites out of the bunch, but you can also make a squirrel and a green owl if you want to! All you need to make the decorations is felt – which Minerva Crafts has in good supply and in a gazillion colours (literally) – plus a needle and thread and some toy stuffing. I also got a long piece of spangly ribbon to make the loops and some Merry Christmas ribbon so that I could make my creatures into a garland.

simplicity 1516 felt woodland animal bunting

To make the felt animals, you simply cut out all the pieces that you need, sew on the faces/arms/antlers etc, sew the back and front bits together with a ribbon loop in between and then stuff some toy stuffing inside. Easy! Some of the pieces are a little bit fiddly (like the eyes and that carrot nose) so I used a little bit of Pritt Stick to hold them in place whilst I stitched them on. I made 2 of each creature in total and then cut out some holly leaves and berries to make my woodland garland that bit more festive.

I hope you love this project as much as I do – it’s so much fun to make and I certainly recommend it!

DIY Scandi-Style Christmas Wreath

DIY scandi christmas wreath
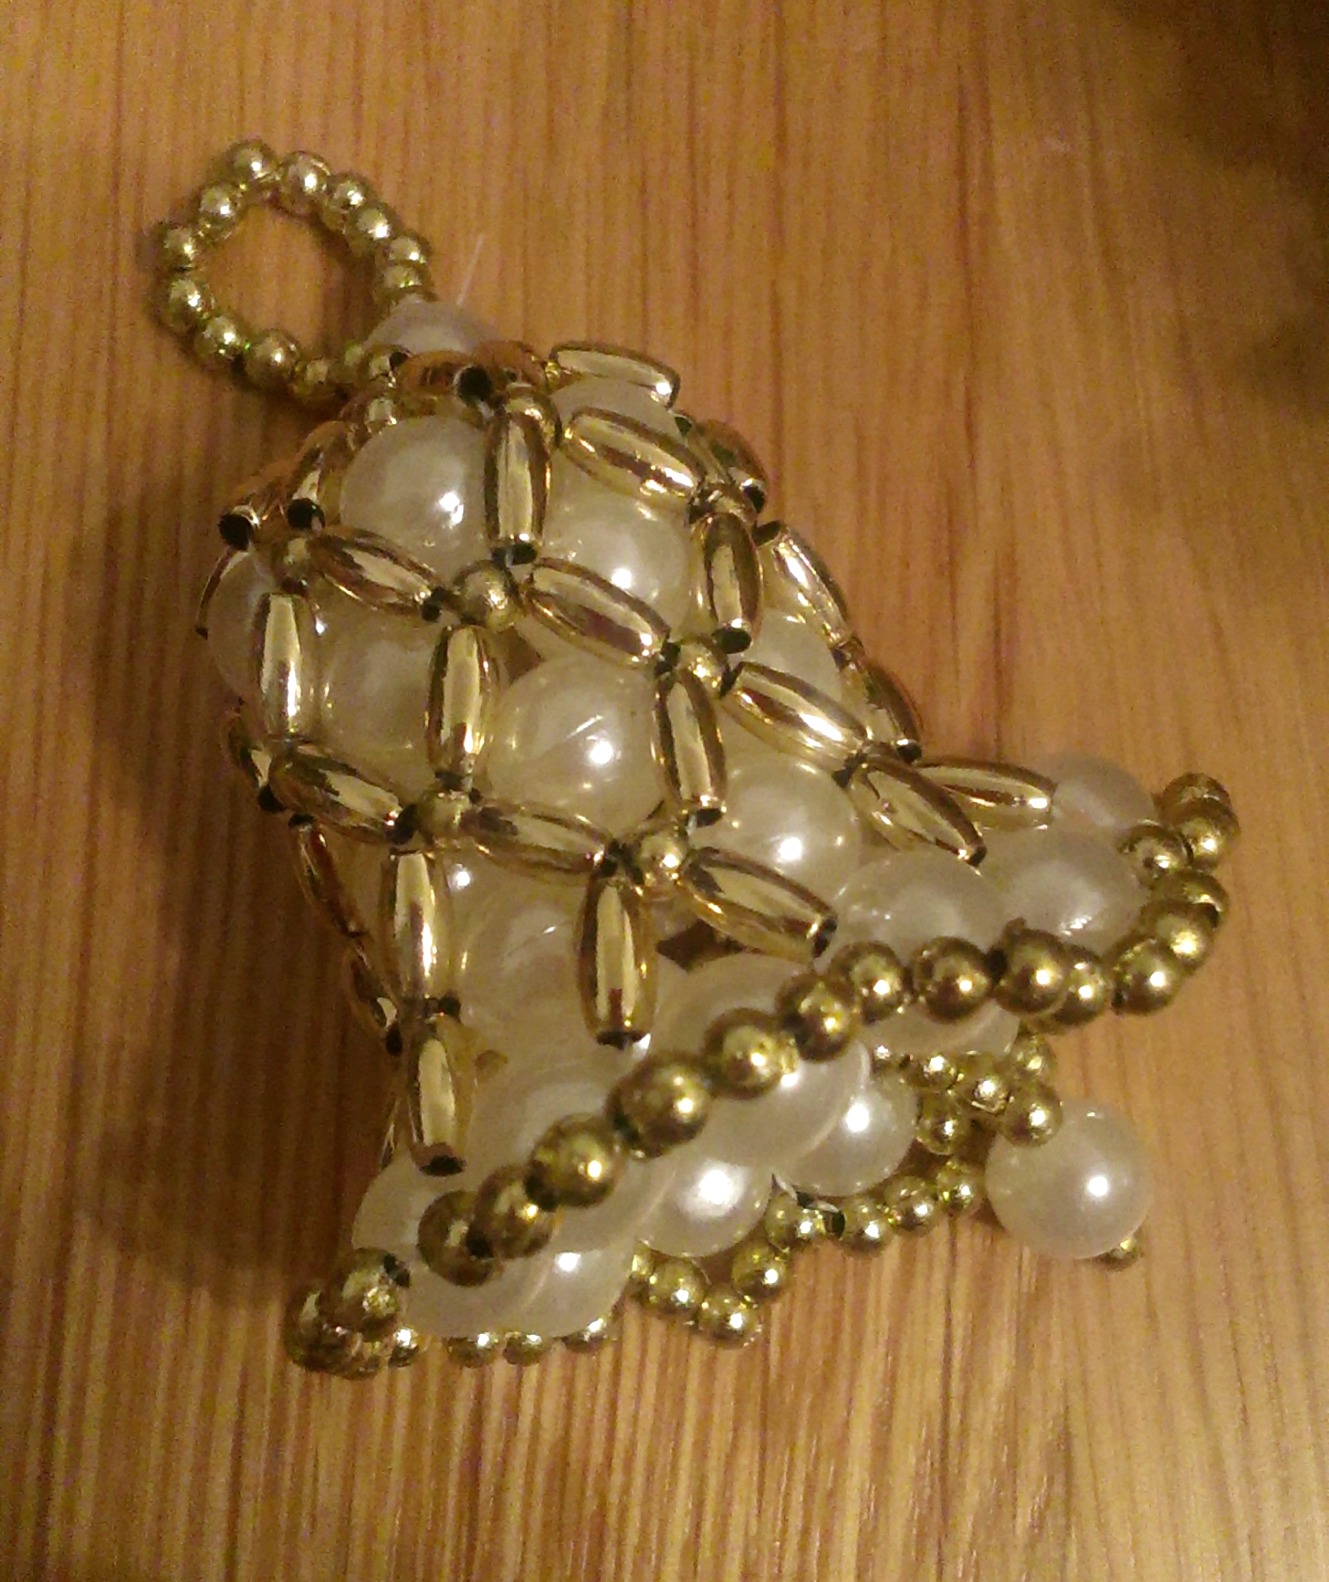
I’m not sure that I’ve ever had a Christmas wreath. It’s a tradition that a lot of families honour – displaying wreaths made of holly, ivy, tinsel and fairy lights on their front doors in the run up to the big day – but a tradition that my own family have just never bothered with. Now that I’ve got my own house however, (and a Hobbycraft store just around the corner) I thought it was about time that I made my very first DIY Christmas wreath! What do you think?

To make your own Scandi-style Christmas wreath like mine you will need: 1x 12″ ratten wreath, 1x 6cm wired robin, 1x reel of striped ribbon, a sheet of red and white polka dot felt, a few pearl beads, some wired ivy leaves and a set of battery powered fairy lights (mine were £1.50 from Primark!).

I love the Nordic Christmas colour scheme – red and white – so it was easy for me to pick a theme for my wreath. I’ve seen so many designs and tutorials out there for wreaths of various kinds but decided to use my imagination instead of following a pattern. Have you made a wreath this year (or in years gone by)? I’d love to see some pictures if you have!

make a scandi style christmas wreath

Festive Flannel Reindeer

christmas treeFirst of all, Happy New Year! For me, 2012 was a year full of crafting and stitching and I expect 2013 to be no different. Thank you to all who have followed my blog, I appreciate all your views and comments, and I look forward to sharing more projects with you over the coming months!

Over the festive period I made a number of Christmas crafts – some of which I’ve already written about – but this final one is a Christmas project I’ve had to save until after the New Year, just in case the recipients of said craft are subscribers to my blog, thus spoiling the surprise.

flannel reindeer
So, what is the final Christmas craft? Flannel reindeer of course! I got this idea from a picture I saw onPinterestand decided that I just had to try and copy it. I already have a multitude of pipe cleaners, Christmas-coloured ribbon and googly eyes in my craft kit so all I had to do was source some reindeer-coloured face cloths and come up with a suitable treat to put inside. I think the original face cloth reindeer are filled with bars of soap, but I decided on a few small sachets of hot chocolate instead. Much more useful!

To make the reindeer, put your filling diagonally in the middle of the flannel and fold two opposite corners of the face cloth neatly into the centre. This will form a tube shape. Pull the two remaining corners together on top and hold them in place with a ribbon. Push in some pipe cleaner antlers, add a face, and there you have it! I made a reindeer for each of my friends back home and think it’s a lovely alternative to a traditional shop-bought gift.

paisley cushionTake a look at this paisley print cushion I made for a family member too. I cut a paisley scarf into strips and then alternated it between two shades of pink material to create a striped effect. The back of the cushion is a corresponding, plain pink fabric with two shiny buttons for decoration. The intended recipient has just bought her first house so I’m hoping this cushion will find a space somewhere on her new sofa!

Dolly Peg Angels

dolly peg angelI’ve opened three doors on the Advent calendar, we’ve put up our first Christmas tree and I’ve watched Disney’s A Christmas Carol: it’s clear that Christmas has definitely arrived chez-nous. We even went on a shopping trip with work this morning to buy lots of tacky decorations for the office. I now have a festive lava lamp and some fake, felt snow on my desk.

Anyway, amongst others, dolly peg angels are one of the handmade Christmas decorations I’ve decided to make this year. These are something I used to make when I was little and, I’m happy to say, are just as fun to make 15-20 years on.

All you need to do is adorn a wooden, dolly peg with paper doilies and white lace. I made a pleated fan from half a doily to create the wings and stuck on some yellow wool for hair. I even managed to find a peg that already had a smiley face drawn on from last time I (or my sisters) decided to create peg angels!

Toilet roll angelThe angel I made now hangs proudly near the top of our Christmas tree and I plan to make a few more when I get chance. Give it a go – it’s a great first time craft!

I’d also like to give a quick shout-out to my sister’s toilet roll angel – inspired by my very own toilet roll nativity scene

The Finished Toilet Roll Nativity Scene

nativity sceneAfter a lot of cutting and sticking, tying of ribbons and drawing on faces, I’m finally proud to say that my handmade, cardboard toilet roll nativity is complete! Let me introduce you, though you probably know them all already…

shepherd and sheepFirst we have the shepherd and his sheep: whilst the shepherds were busy tending to their flocks, an angel came to them and said ‘Today in the town of David a Savior has been born to you; he is the Messiah, the Lord. This will be a sign to you: You will find a baby wrapped incloths and lying in a manger.’

three wise men

Next we have the three wise men: three magi ‘from the East’ spotted the Star of Bethlehem in the sky and followed it all the way to the birth place of the baby Jesus. Here they worshiped him and presented Jesus with gifts of gold, frankincense, and myrrh.

And finally we have Mary, Joseph, angel Gabriel and the baby himself (below): the angel Gabriel comes to Mary and tells her that she will have a baby whom she will name Jesus. Joseph accompanies his wife from Nazareth to Bethlehem and Mary gives birth in a stable (because there was just no room in that inn).

nativity scene 2All the people in my homemade nativity scene are made from toilet roll tubes that I’ve bedecked with glitzy papers, ribbons and materials out of my craft box. Look closely and you’ll see the three wise men are carrying their gifts, that the sheep is made of cotton wool, that angel Gabriel has a golden pipe-cleaner halo and that the baby Jesus is wrapped in swaddling and balanced on a lollipop stick manger tied together with string!

This is definitely one of the best Christmas crafts I have ever made. Thanks to my sister for the inspiration, this lovely nativity scene will stand proud on my dining room table this year – let me know what you think!