 First up is the felt robin decoration. Begin by cutting out 4 shapes from greaseproof paper (baking parchment) in the shape of the robin’s body, an oval for the red chest, a triangle for the beak and a heart shape for the wing. Click on my template image to the right to enlarge it. The felt I’ve used is in dark brown, golden brown and bright red.
 Next, trace around the shapes onto your coloured felt and cut them out (see picture left). Make sure you do 2 of each shape so that you have two robins to stitch back-to-back later on. I also recommend you cut out a few spares in case you go wrong. You’d be surprised how easy it is to accidentally chop off a beak!
 Once your robin parts are cut out, assemble them neatly and stitch around the edges using matching embroidery thread. I used a sequin for the eye too, but you could use a bead or a round piece of felt if you prefer. Again, remember to make two of each and this time make sure you sew them as mirror images. You don’t want to end up with two robins facing the same direction and suddenly find your plan to sew them back-to-back has gone awry (this is just as easily done as cutting off a beak).
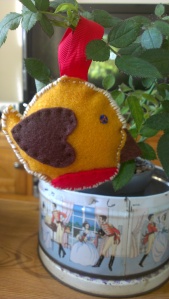
 Step four is to sew your two robins together. Use white or cream embroidery to make it look a bit like a Christmas gingerbread. Try to get all your stitches the same size too – it’s quite difficult but the end result will look much neater! Leave an inch gap at the top to push a bit of wadding in, insert some ribbon and then sew it up.
Here’s a picture of my first attempt. Not quite as professional looking as I’d hoped for but definitely a step in the right direction for our ‘homemade Christmas’!
I gave my felt decorations a second attempt too – click here for the felt pudding decoration and felt Christmas tree decoration, and the felt gingerbread man!


Pingback: Felt Christmas Decorations, round 2 « Sew Sensational ♥
So cute!
LikeLike
Pingback: 3 Year Blog Anniversary – My Top 5 Posts! | Sew Sensational ♥
Why do you need to cut out the shapes on grease proof paper first? Forgive my ignorance….only a knitter and crocheter but am quite interested in felts….they look great ^.^
LikeLike
Hi! You don’t need to cut them out on paper first – I only did this because I was making more than one robin and so needed the template to draw around several times 🙂 I like greaseproof paper because you can see through it (useful if you’ve got a patterned fabric and want to to be able to see which bit of pattern you’ll be cutting out!). Thanks for the comment!
LikeLike
Oh I see good idea ^.^ I hope I find time to try these! Thanks for tips!
LikeLike