Yarndale 2017 in Photos

This weekend (23rd-24th Sept) marked the 5th annual Yarndale festival in Skipton, North Yorkshire. This is the 4th time that I’ve been and I loved it just as much as every other time before! Here are a few photos of my day at this wool-lovers paradise:

Kwik Sew Pinafore for Sewing World Magazine!

Kwik Sew 4138 Pinafore

Pinafore dresses are the talk of the sewing town at the moment. Nearly every blogger I know has made the Tilly and the Buttons Cleo dress (which has reached an almost cult status!), but I wanted to see if the same look could be achieved using a different pattern to go against the grain a little. It turns out there really aren’t many other pinafore patterns out there to choose from, but I settled on Kwik Sew 4138 which I think is a lovely alternative to the Cleo.

If you’d like to read more about my pinafore, then take a look at the October 2017 issue of Sewing World Magazine (available mid-September)! I made this project on behalf of Minerva Crafts especially for the magazine, using some fabulous 4oz denim cotton, and I think it was a success! It was a fun project to sew and would be a great layering piece for autumn/winter. Hope you like it!

DIY Patchwork Baby Blanket

As soon as I found out my sister-in-law was expecting, I knew I wanted to make her a blanket. Baby blankets are useful in all situations, whether it’s as a comforter in the cot, for warmth in a pram, or simply as a comfy floor covering whilst baby lounges around. So that’s what I’ve got to share with you today – a patchwork baby blanket!

elephant patchwork baby blanket

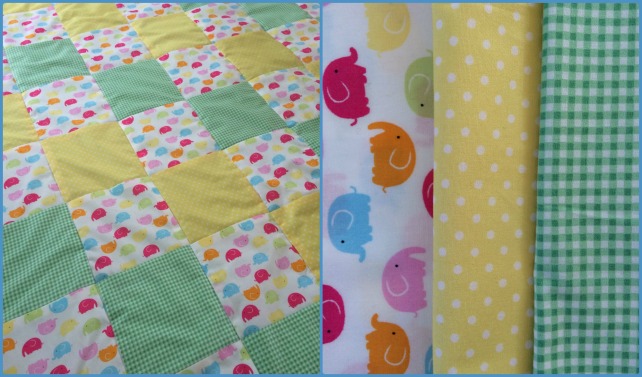
Now, I’d like you all to know that I made this blanket before I knew the baby would be a boy. I also made it before I learnt that my sister-in-law was going with a grey and white colour scheme. But when can you make a brightly coloured quilt if not for a little one?!

The fabric I used for my patchwork blanket is from the Remnant House in Harrogate. I bought fat quarters of yellow polka dot cotton,  elephant print cotton, and about 2 metres of green gingham cotton to use for both the patchwork squares and the backing.

patchwork baby blanket

Now it’s time for the maths (thanks to my cat, Barnaby, for helping me measure)! I didn’t follow a pattern to make this blanket – it’s all DIY and common sense. Based on the number of fat quarters I had, I worked out I could make the blanket 8 by 9 squares, 72 in total – 18 yellow, 18 green and 36 elephant. I stitched the squares into rows with a 1cm seam allowance, and then stitched the rows together one by one to form the front of the blanket. Easy!

Next, I attached the patchwork front to a thin layer of 2oz wadding by quilting down the vertical seam lines. Go slowly when you attach the wadding so that it doesn’t get caught in your sewing machine!

baby blanket backing

The back of the blanket is simply a big square of green gingham with a strip of elephant print cotton along the top and bottom edges. To assemble the blanket, I then put the patchwork and backing pieces right sides together and stitched 1cm from the edge all the way round 3 sides. I then turned the blanket the right way out (so the wadding is now in the middle), pressed under the seam allowance on the open edge, and stitched a 1cm border all around the blanket. Oh and I added a little ‘handmade’ tag for good measure.

So do you love it? Do you think it’s suitable for a new baby boy? I hope he loves it too!


I’m the Back Page Blogger in Sew Now Magazine!

Sew Now Magazine Issue 10

Just a quick post today to show off my latest feature – I’m the Back Page Blogger in July’s Sew Now magazine! The feature is in issue 10 of Sew Now, out on 6th July. I was super honoured to be asked to do this interview, so I hope you enjoy it if you get a copy 🙂

Knitted MillaMia Elk Cushion

MillaMia Elk Cushion
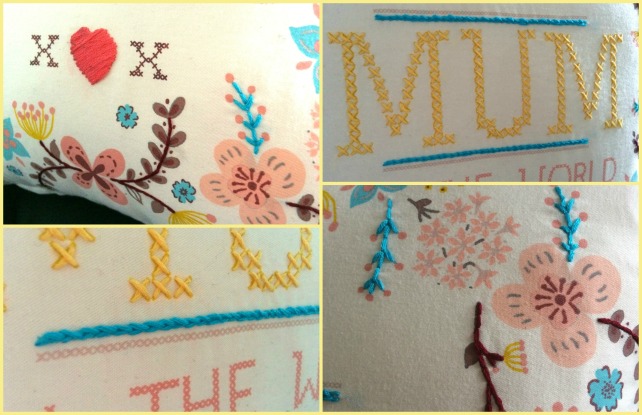
I’ve had this knitting project on the back burner for absolutely ages. It’s one of those projects that you pick up and do a few rows of, but then you get tired and have to put it back down again, so it’s been a long time coming! I’m so glad I persisted with it though – doesn’t the finished cushion look great?

For this knitting project, I used the MillaMia Elk Cushion pattern that I bought at the Knitting and Stitching Show in Harrogate a couple of years ago (I actually bought the Elk Cushion Kit, which contains the pattern and required amount of 4-ply yarn). I was drawn in by the adorable Nordic design on the front of the cushion, which is described as an ‘elegant design of hearts, chain people and elks (or are they reindeer…?)’

millamia elk cushion kit

The cushion uses 100% merino wool, so it’s very soft to the touch. I used 2 balls of Claret (104) and 2 balls of Snow (124), as well as a pair of 3.25mm needles and a 30cm(ish) cushion pad.

millamia elk cushion close up

I think I started knitting the cushion around a year ago and finished sewing it up this past week. The eagle-eyed among you may notice that I knitted the design upside down, with the elks at the bottom rather than the top. Oops. I think it looks fab on my Scandi M&S chair though, don’t you?

Sew Over It Silk Cami Top

Sew Over It Cami TopHey guys! It appears as if this is my first sewing project since the start of April, so welcome back! I put the radio silence down to a couple of things: a lot of busy weekends and the fact I’ve been working on a secret sewing project for a magazine feature. I’m keeping that project under wraps for now but it’s taken up all my sewing time recently! Anyhow, I’m back today with a quick project that I whipped up this weekend: a silk camisole top.

I received the Sew Over It silk cami top kit as a birthday present last year and it’s been on my ‘to make’ list since January. Now that the weather’s beginning to warm up, I’ve been inspired to get it started!

The kit contained the sewing pattern, instructions and a length of silky viscose fabric in this very cute bow print (which actually looks a bit like bones from a distance!). Unfortunately, the cami kit is discontinued now, but some sewing shops still have a few hanging around if you keep your eyes peeled! The PDF pattern for the top is also still available from the Sew Over It website. As for the fabric, any type of viscose would sew up lovely – Minerva Crafts has a great range of affordable ones that I’m tempted by!

Sew Over It Silk Cami

There are only four pattern pieces needed to make this camisole so it’s the perfect project for an afternoon. I think it took me about two hours to finish! There are the front and back pieces, plus two for the neck/armhole facings. I read a few other blogs about the Sew Over It cami pattern and some people got a bit confused with the method for sewing on the facing, but I managed it fine and with only one minor unpicking incident required.

Sew Over It Silk Cami Kit Top

Overall I really like this pattern. I thought the neckline might be too low for me but it actually sits about right without making any adjustments! The length is also nice on me – it’s just long enough to cover my bum or to tuck into a skirt. I’m only 5’3 though so I imagine this is normal waist length for most people! What do you think? Have you made the Sew Over It cami before?

PS – I’d just like to say a massive THANK YOU to everyone who’s following my blog and reading my posts. After publishing this project I noticed that I’ve achieved over 2,000 followers which is incredible, so thank you! 🙂

Save

Save

Blogger Network #32 – Chambray Shirt Dress, New Look 6449

New Look 6449 Shirt Dress

Hello April! I don’t know where the time is going these days, but it seems as if I haven’t shared a project with you for a whole month and it’s time for another Minerva Blogger Network post already! In my defense, this month I’ve made a lovely chambray shirt dress (New Look 6449) to share with you, and we all know that shirt dresses don’t just sew themselves together overnight… (can you imagine?!). I used this charcoal grey chambray to make my dress, then finished it off with 12 of these silver shell-effect buttons and an Eiffel Tower motif. What do you think?

Click here to head to the Minerva Crafts website and read/see more of my shirt dress!

Blogger Network #31 – Merchant & Mills Camber Dress

merchant-and-mills-camber-set-dress

Hello March! Time for another Minerva Blogger Network post and this month I’ve made the Merchant & Mills Camber dress in a geometric print linen/cotton fabric. This is the first time I’ve ever used a Merchant & Mills pattern and I was really impressed with it! My finished dress is very wearable and it makes a great addition to my everyday wardrobe.

See more of my Camber dress on the Minerva Crafts blog here!

‘Mum’ Cushion Embroidery

embroidered-mum-cushion

Hello there! Just a quick post for you this week as I wanted to share the bit of embroidery work I did on this cushion for my mum’s birthday. I bought the cushion in Asda Living (it’s part of their Mother’s Day 2017 collection)  but decided I could improve the design with a few stitches! Using all six strands of embroidery thread, I simply cross stitched over the ‘mum’ in yellow, did a turquoise blue chain stitch either side, a few back stitches in turquoise and plum purple helped to enchance the leaves and stems around the edges, and I also went over the heart at the bottom with a series of long stitches in coral pink. And that’s it! A quick yet effective update. Happy birthday mum!

cushion-embroidery

Blogger Network #30 – Monochrome Megan Nielsen Sudley Dress

megan-neilsen-sudley-dress

Hello everyone! It’s time for my first Minerva Blogger Network post of the year, and this month I’ve made the Megan Nielsen Sudley dress in a lovely black and white floral viscose. One of my sewing resolutions for 2017 was to be a bit more mindful and intentional with my sewing projects, so I’m aiming to focus on garments that I’ll wear often and/or that match other items I own. With that in mind, click the link below to read more about my make!

Read more about my Sudley dress on the Minerva Crafts blog here!