Grainline Linden Sweatshirt in Liberty Jersey

grainline-linden-in-liberty-print*disclaimer: whilst this is my first post of 2017, I actually made this sweatshirt last year. Do forgive me…

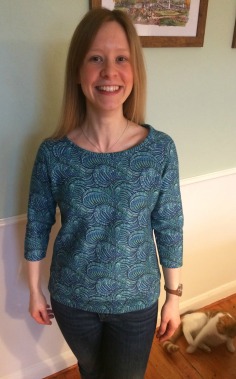
Hello everyone! For today’s post and for my first project of the year, I wanted to quickly show you the Liberty print sweatshirt that I made back in October/November. I haven’t actually worn this since I made it because the cropped sleeves and slightly wider neck make it a bit more Spring-appropriate, but it’s a great garment nonetheless and I wanted to tell you about it!

This is the first time I’ve ever used a Grainline Studios pattern and I have to say, I really liked it. I used the Linden sweatshirt pattern for this make, and it’s printed on really sturdy pattern paper that can easily be used again without fear of ripping. The Linden is one of those patterns that all bloggers seem to have made at some point, and now that I’ve made one I can see why. The pattern is nice and easy to sew up and it’s a very wearable piece of clothing. I can definitely see myself making another!

grainline-linden-sweatshirt-liberty

The fabric I used for my Grainline Linden is another blogger favourite – the super popular Liberty sweatshirt knit in rich blues and greens that Minerva Crafts had on sale for £14.99/metre last year. Unfortunately, this fabric has now sold out, so you’ll have to enjoy it from afar instead! You could make the Linden with any sort of medium-weight knit fabric though, so keep an eye out for sweatshirt fleece, French terry or thick jersey fabrics. I only needed 1m of fabric in total, but that’s perhaps because Liberty fabrics are generally around 60″ wide. You’ll  probably need around 1.5/2m if you’re using a different type of fabric.

liberty-print-linden-sweatshirt

What do you think of my finished Linden? Have you ever made this pattern? If I was to make it again I think I’d put a bit more work into the fit of the neckline – I think because the fabric is quite thick, it’s made the neck band fairly stiff and it doesn’t sit flat against my body. I also chose to make the neck band in the main fabric, rather than using a contrasting ribbed knit like the pattern suggests, so only I can be held accountable for it not being 100% right!

#2017makenine – What I Plan to Stitch This Year

Happy New Year everyone! I hope you all had a restful and peaceful Christmas break. You may have seen my last post of the year – a round up of everything I made in 2016 – and for my first post of the new year I wanted to hop on the #2017makenine train and show you what I plan to make in the upcoming months. So here we go, and in no particular order:

2017makenine-sew-sensational

Top Row, Left-Right

1. MillaMia Elk Cushion – I bought this cushion kit at the Knitting and Stitching show a couple of years ago, and it’s very nearly finished! I’ve completed the fairisle front and now just need to slave away on the plain back until it’s done.
2. Sew Over It Silk Cami – I received this pattern as a gift, along with some silk bow-print material, so I look forward to it being a simple-yet-useful make for summer.
3. Burda 6849 Shirt – I’ve made a chambray shirt with this pattern before, and I have 2m of Liberty print lawn in my stash that is calling out to be used.

Middle Row, Left-Right
4. Merchant and Mills Camber Dress – A birthday gift, my husband bought me this pattern plus some linen-look geometric fabric with which to make it. A simple shape but a dress I’ll hopefully wear often.
5. Tilly and the Buttons Rosa Shirt Dress I bought this pattern when it came out in 2016 and have a length of aztec, woven chambray that I just hope will be big enough!
6. Megan Nielsen Sudley Dress – my first make of the year for Minerva Crafts, this loose fitted dress will be made in a silky monochrome viscose and should be good for spring.

Bottom Row, Left-Right
7. Simplicity 1563 PyjamasThe second of my Minerva Crafts makes, I plan to make a pair of cosy, brushed cotton pyjama trousers with a matching jersey t-shirt.
8. New Look 6449 Shirt Dress
Another shirt dress and more chambray! And my final upcoming Minerva project, this time in a timeless charcoal chambray that will match with anything.
9. M&S Safari Crochet Kit – 
A fun Christmas present from my sister, this year I hope to learn how to crochet and make these cute zoo animals.

What are your plans for the new year? Are you making as many shirts/dresses as I am? Let me know in the comments!


Sewing in 2016 – My Year in Review

As the year comes to a close, I like to take a look back on all the projects that I’ve made over the past 12 months and showcase them in one satisfying visual. In 2016 I accomplished and blogged about 17 completed projects – that’s an average of 1.4 items per month, including 13 dressmaking/sewing projects, 3 craft projects and a knitted bobble hat. I’ve also used a variety of pattern makers: I can see Tilly and the Buttons, By Hand London, McCalls, Simplicity and New Look in the gallery here. And this doesn’t take into account the handful of things that I’ve made and not blogged about, or not quite finished, so perhaps that total is nearer 25 than 17.

2016-in-review

So what have I learnt this year?

  • I now take longer on my projects than I did in 2015. Last year, I completed 27 projects – that’s 11 more than 2016! This is partly because I don’t seem to have as much free time as I used to (hello house improvements), but also because the projects I’m choosing are often that bit more complicated, and so take more time and care to complete.
  • Blue and red are my colours. I think I knew this already, but seeing it laid out in one handy photo grid definitely confirms my colour palette for future projects! Knowing what does (and doesn’t) suit me makes choosing fabrics and patterns much, much easier.
  • I love a good Christmas craft. This isn’t news either, but Christmas projects did make up 1/4 of my total for this year…
  • Knitting takes me forever. I knitted my bobble hat over the course of a weekend because it was made with chunky yarn, and I parked myself in front of the TV for hours, but that Millamia fairisle cushion I wanted to get done by Christmas? Well, let’s just say it’s taking longer than expected.
  • Moving into 2017, I need to make use of what I already have. I uploaded 94 fabrics from my stash to the Cora app (!!!), and have numerous sewing patterns and books on my shelves that I’ve been wanting to use for ages, as well as various WIPs. 2017 will be the year this happens.
  • I need to spend more time working on the fit. Every single garment I make has some sort of fitting issue… as time goes on and I make more and more things, the issues have become fewer and less significant, but I still have trouble understanding the shape of my shoulders, back, waist etc. I really need to study this harder!
  • I also need to sew what makes me happy. No more jumping on bandwagons or sewing to tight deadlines, as this only causes me unnecessary stress or leaves me with piles of to-do’s that I know will never get done. Sewing is my hobby and my escape, and I need to sew for me and not because I ‘have to’.

So how was your 2016? Did you complete more or fewer projects than me? And what are your goals for the new year? I hope you all had a wonderful Christmas period and have enjoyed reading my posts over the past 12 months. I really do appreciate your attention, comments and support – so thank you, and happy new year!

I Knitted a Woolly Hat! + Free Knitting Pattern

free-bobble-hat-knitting-patternA few weeks ago, Let’s Knit magazine Tweeted a link to this free bobble hat knitting pattern for newbie knitters. I’ve done a bit of knitting here and there, but I’d still class myself as a beginner, so when I saw this pattern I knew it was something I’d be able to accomplish! So I downloaded and printed it straight away, and off I went…

The knitting pattern is for a simple, ribbed knit hat with a pompom on the top. The only stitches you need to know are knit (k), purl (p), knit/purl two together (k2tog/p2tog), and ‘slip one, knit one, pass slip stitch over’ (skpo). That last stitch is a lot easier than it sounds, and the pattern gives you a step-by-step instruction of how to do it too (very helpful). You’ll also need 5mm and 6mm needles, plus one 100g ball of chunky yarn – I used a ball of Deramores Vintage chunky in ‘Rose’ that I’ve had sat in my stash for a while (it’s 50% merino wool so incredibly soft and cosy), but any colour/brand would work just the same.lets-knit-bobble-hat-pattern

I knitted this hat over the course of a weekend – I think I might’ve done 3 hours on Saturday and 3 on Sunday. I didn’t have a single problem following the pattern – after you’ve cast on 90 stitches for the women’s variant, you simply knit/purl in a ribbed pattern until you get to the top where the shaping happens. You then sew up the seam and make a pompom to attach to the top. Easy!

If you’re new to knitting (or aren’t very confident) then this is a great pattern to start with. It’s easy to follow, quick to make and is something that you’d actually want to wear when it’s finished. It’s also a great last-minute, handmade Christmas gift idea! I love my new hat and can’t wait to wear it when the cold weather comes around! Even if I do look a bit like a tea cosy  🙂

Save

Save

Blogger Network #29 – Scandi Christmas Lilou Dress

tilly-and-the-buttons-christmas-lilou-dress

Happy December everyone! It’s time for my latest Minerva Blogger Network project, and this month I’ve made a Tilly and the Buttons Lilou dress in red and white Scandi-style Christmas fabric! Perfect for all the upcoming Christmas parties, dinners and gatherings, don’t you think?

Click here to read more about my Lilou dress!

Save

DIY Christmas Button Wreath

handmade-button-wreathHello! I’ve got another festive make for you today and I think it’s one of my favourites so far: a do-it-yourself Christmas button wreath! I think it’s perfect for a sewing or crafting fanatic’s home, don’t you?

The inspiration for this make came from the lovely Lisa at A Spoonful of Sugar. I saw her own button wreath on Twitter and knew straight away that it was something I’d like to copy. Who else has a collection of 10 million buttons at home that they need to use up? My sister thinks I need to join Button Hoarders Anonymous, but I’m sure it can’t just be me…

If you’d like to make a button wreath of your own then you’ll need:
button-wreath-what-you-need– Buttons! My sister and I spent a good half hour sorting through my collection to pick out all the red, white, green and gold ones, but you can pick whichever colours you want. I think we easily used about 400 buttons.
– A 30cm polystyrene wreath.
Dressmaker pins.
2.5mm beads. I used pearl coloured ones.
– Co-ordinating ribbon. I used some by Gisela Graham that I had in my stash.

diy-button-christmas-wreathDecorating the wreath is very easy! My sister and I spent about 3 hours yesterday afternoon pinning in all the buttons. You simply thread a bead onto your pin, and then push the pin through the hole in the button and straight into the polystyrene. It’s important that you don’t forego the beads as these prevent the buttons from falling off! We chose to go for a random colour pattern too, although you could do stripes, varigated colour or all one colour if you wanted.

how-to-make-a-button-wreathI also chose to pin a ‘Merry Christmas’ ribbon around the outside edge, and a red and white striped ribbon to the inside edge, partly because I like the look of it and partly because we were running out of buttons to cover the entire wreath! I’ve estimated that we used around 400 buttons for this, so you’d easily need 500+ to cover every available space. I had a mixture of button sizes too, ranging from tiny shirt buttons to bigger 2cm diameter ones, and in a variety of different shapes and shades.

diy-button-wreath-ribbon

Finally, I made a loop out of ribbon to hang my wreath with (this is just pinned in place on the back), and then used a piece of wide red ribbon to create an over-sized Christmas bow, which I also pinned in place on the top. And there we have it! An afternoon well spent. What do you think?

make-a-button-wreath

Save

Save

Save

Save

Blogger Network #28 – Felt Christmas Decorations

dimensions-holiday-home-felt-ornaments

Hello November! A new month brings with it a new Minerva Blogger Network project, and this month I’m keeping things festive with these cute felt Christmas house ornaments. These were an absolute delight to make and I think they’ll look lovely alongside the Father Christmas cushion I made last month – don’t you?

Click here to read more about my festive make!

New! Issue 1 of Sew Now Magazine

Have you heard of the new Sew Now magazine? Issue 1 was released last week from Practical Publishing (the people behind Love Sewing magazine) and I was very kindly sent the first issue to have a read through. I thought I’d share my favourite bits!

sew-now-issue-1

Issue 1 comes with a free accessories mini-magazine (containing all sorts of quick projects, from bags to necklaces and the fab Liberty-print shoes photographed below), plus the Simple Sew Zoe dress pattern. I’ve had my eye on this dress pattern for a while so to get it free with the magazine is a bonus!

sew-now-magazine-issue-1

The projects inside the magazine range from beginner to more advanced, with some projects taking just a few minutes to throw together and others that could take you a whole weekend. I quite like the mix of projects too – bags, shoes, knickers, dresses, tops, placemats, upcyling… I found myself looking forward to turning every page to see what would be next!

(Also, this issue of the magazine gives you a link to order the By Hand London Victoria blazer for free! How great is that?)

sew-now-magazine-issue-oneMy favourite parts of the magazine (that I think set it apart from most other sewing mags) are the pages featured above. I really love how they show you high street clothes, but also give you ideas for which fabric and sewing patterns you could use to recreate these looks for yourself. I thought that was a very novel idea! I also love the ‘hot off the press’ page which gives you an overview of all the new patterns that have been released by indie pattern companies.

Alongside the features I’ve picked out here, the magazine this month also has an interview with lingerie-maker Maddie from Madalynne, instructions for how to cross stitch a design onto an old denim shirt, and tips for sewing a leather bag. If only I had time to make everything!

Save

Save

Save

Save

Simplicity’s New Collection: the 8131 Blouse

simplicity-8131-blouseIt’s October, it’s a new season and, with it, comes a new collection of sewing patterns from Simplicity! I was emailed by Simplicity a few weeks ago with a link to their new collection of patterns and couldn’t wait to get sorting through them. Which one is your favourite? I picked to make the new 8131 blouse!

The Simplicity 8131 blouse is ‘a V-neck bow blouse pattern allows you the ability to choose different bow styles and sleeves plus round or pointed hem.’ You can also do an off-the-shoulder style if you want to be really on-trend! I chose to make view B which has no sleeves, a rounded hem and a cute little pussy-bow neck tie. Despite all those features I actually think I selected the most simple pattern of the lot, but I wanted to make something that I’d be more likely to wear regularly than the bare-shoulder or long-sleeved variants.

simplicity-8131-blouse-neck-tie

The fabric I used for my blouse is a navy floral viscose that I actually bought on eBay, but there are loads of other lovely navy viscoses available at Minerva Crafts here if you want to take a look! Viscose is a really soft, drapey fabric and suits the bow neck-tie feature on this blouse really well. It feels a little like wearing pyjamas when you’ve got it on which is win/win really! However, viscose can be both quite slippery and stretchy to work with so make sure you cut our your pattern pieces accurately and use lots of pins to avoid producing a slightly wonky garment…

simplicity-8131-view-b

simplicity-8131The pattern instructions are what you expect from Simplicity – very easy to follow with clear pictures for each step and I didn’t have any problems. I’d probably recommend this pattern for an intermediate-beginner as there are a fair few techniques needed, such as the rounded hem, gathering on the shoulders and attaching the tie/collar. If you’re new to any of these techniques then the pattern instructions are clear enough to help you out, but it’s always good to know what you’re doing beforehand!

So what do you think? Will you be having a go at any of the new Simplicity patterns this autumn?

Blogger Network #27 – Father Christmas Cushion

Design Works Santa Cushion Kit

Welcome, October! It’s time for a new Minerva Crafts Blogger Network post and this month I’m crossing my fingers and hoping you don’t think it’s *too* early for something a bit festive! I actually made this Design Works Embroidery Santa Cushion Kit on the first rainy weekend back in September and I’ve been feeling wonderfully Christmassy ever since. Isn’t he just adorable?!

Click here to read more about my make!

Save